Hello my friends! Thanks for joining me for another Blast from the Past! I am trying to releasing older videos that I uploaded and never released. Hopefully they may spur your creativity or remind you of other ideas you had in your arsenal but forgot about, etc. I know sometimes I forget about techniques I might have used in the past so even for me it is a reminder and or a jumping off point to think about new ideas related to the technique 😉 .
Today’s project uses alcohol ink and glossy paper, and a stencil- pretty simple ingredients for creating a base background. I am using a stencil that one of my own stencils that looks like bubble wrap, but you can use a store bought one. I have lots of discussions on making/using homemade stencils on this site. Here’s one where I talk about how I cut Yupo paper on a Silhouette Curio.
I start out with a blue color alcohol ink (I believe it was Denim. NOTE: I am trying to be better now about showing the colors I use after some requests for that 🙂 ) and I color the background of the cardstock. I use the Tim Holtz applicator with a felt and I just spread the color over the background of the glossy paper. Then I use a stencil (less detailed is better here) and I re-ink using the same color that I colored the background so that we can get a tone on tone look. I use the applicator to apply the same color ink through the stencil.
I didn’t stop there. Instead I reused the stencil (you could also use a different one) and used it offset a bit from the previously stenciled design to color with a different ink color. And the nice thing about alcohol ink is you don’t have to worry quite as much about using different colors over each other. You can still get mud, but you don’t have to worry quite as much about mixing colors from the opposite sides on the color wheel like you do regular ink, or paint (if it’s wet) where you end up with this kind of icky brown mess. With alcohol ink, you can layer different colors and get cool backgrounds going.
So then I decided to drip alcohol ink like you sometimes do with regular ink and paint. I put lines of a couple of colors of ink on across the top, and then if it’s wet enough, you can just drip it straight. If it’s not, you can add in some of the blending solution (or alcohol in a pinch), get it a little bit wetter, and then let it drip. Then I did the same on the other side of the paper.
NOTE: you have to work fast with alcohol inks, because they do dry very, very quickly.
The next thing I did was to take the ink directly and just do spots of color. And if you layer it over other ink, you’ll see it starts to react and kind of spread out. You can continue and put more ink in the middle of your dots that you’ve already done.
And then the other fun thing that you can do is drop the blending solution and that will react as well, and it will open up the spaces and make them a little bit lighter.
You can keep dripping and layering until it gets too wet and then I usually put it aside and let it dry.
Sometimes after it’s dry I come back come back over with a stencil and keep at it, but you can stop at any time.
Alcohol inks are a lot of fun to play with. Alcohol inks stay vibrant on the glossy paper. If you use it on regular matte cardstock, the inks tend not to be quite as bright and it’s not nearly as fun and cool looking as it is on the glossy paper. Of course there are things that you can add on top of matte paper to work better with Alcohol ink, but more on that is a future topic 😉
This project creates a super busy background, which is great on it’s own. I will re-visit this background in a future session to show how to work with it if it’s getting in the way of a transparent embellishment.
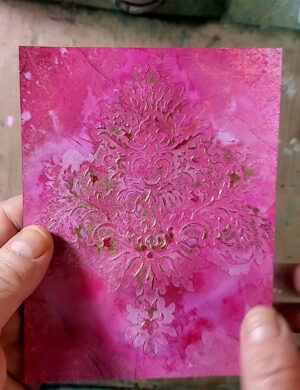
Here’s the result of this background:

Enjoy!